We Got A Pool!!!

IMG_4530.JPG

Finally…the blog post many of you have been waiting for…we will cover why we got a pool, how we went about getting quotes and why we chose the company we did, types of pools, timeline, total cost breakdown, biggest surprises to be prepared for and what we think! Buckle up, this is going to be a good one!!

Why a Pool:

On our endless walks over the course of this pandemic, Mr. SH and I talked A LOT!! We talked about what life was going to look like in the coming months, how we were going to provide some sense of normalcy for our kids this summer when all camps, vacations and social activities were canceled. What would be the best use of the money we were putting toward all those things. We thought about adding a front porch for a while and then, one day, I said what about a pool? We had talked about putting a pool in one day, but there were always other projects to do first, and these overtook the pool and sent it to the bottom of our projects wishlist. For the first time, it seemed to make its way to the top! As with every project, I told Mr. SH I was just going to do some “research” and proceeded to talk/convince him in the coming weeks about why it was a great idea: who knows how long this pandemic will last, we will have it for a lifetime, kids and grandkids can use it, vacations are temporary, many happy memories can be made!

Getting Quotes:

Around the first week in May, I got the name of a company a friend had used for their pool. I called and I have to say, I was treated as if they did not really want or need my business. They gave me one option for a pool and told me I was looking at end of August/early September. That was discouraging. I kind of gave up, thinking that was the only company I really knew in our town who installed pools. The next week (second week of May) I decided to call more places. I looked up on our local town facebook group, scoured the internet, and ended up having 5 companies come out to give estimates over that week. Some only did one type of pool, others said too late in the season. It came down to two companies. Having that many companies come out, gave us more and more knowledge about shape and size of pool, type of pool and layout. In the end we went with a company called In2Blue in Norwalk, CT. Nick, the owner was kind, patient and super helpful. He understood what we were looking to create and helped us tweak our vision. And he said the pool would be done around the first week of July, which we loved to hear. He was sincere and honest and not at all sales-y.

Types of Pools:

In our area (the Northeast), there are three types of pools companies install: Vinyl Liner, Fiberglass and Gunite (concrete/stone).

Vinyl:

Pros: least expensive - prices start around 30K (this was a huge factor in our decision), Fairly low maintenance, can be made to look like stone, depending on the liner color you choose, been around forever

Cons: Liner will need to be replaced at some point - 10-15 years and can cost anywhere between 3K-5K, not the current “trend”, in my opinion, can look cheap if not careful with liner choices, coping, etc…, can take around 3 weeks to install

Fiberglass:

Pros: super fast installation, about 1 week, maintenance free after installed, currently on “trend”

Cons: Cost - these pools have a base price of around 45-50K, fairly newer product, to me they look plastic-y, been told they can blister, but have no experience with them obviously

Gunite: Pros: Traditional stone swimming pool, classic and timeless

Cons: Cost - can range from 75-150K just for the pool, because of rough winters in our area, they can crack and be damaged, rough bottom - kids begged to not have the pool that they “scrape their toes and bodies on”!

Timeline:

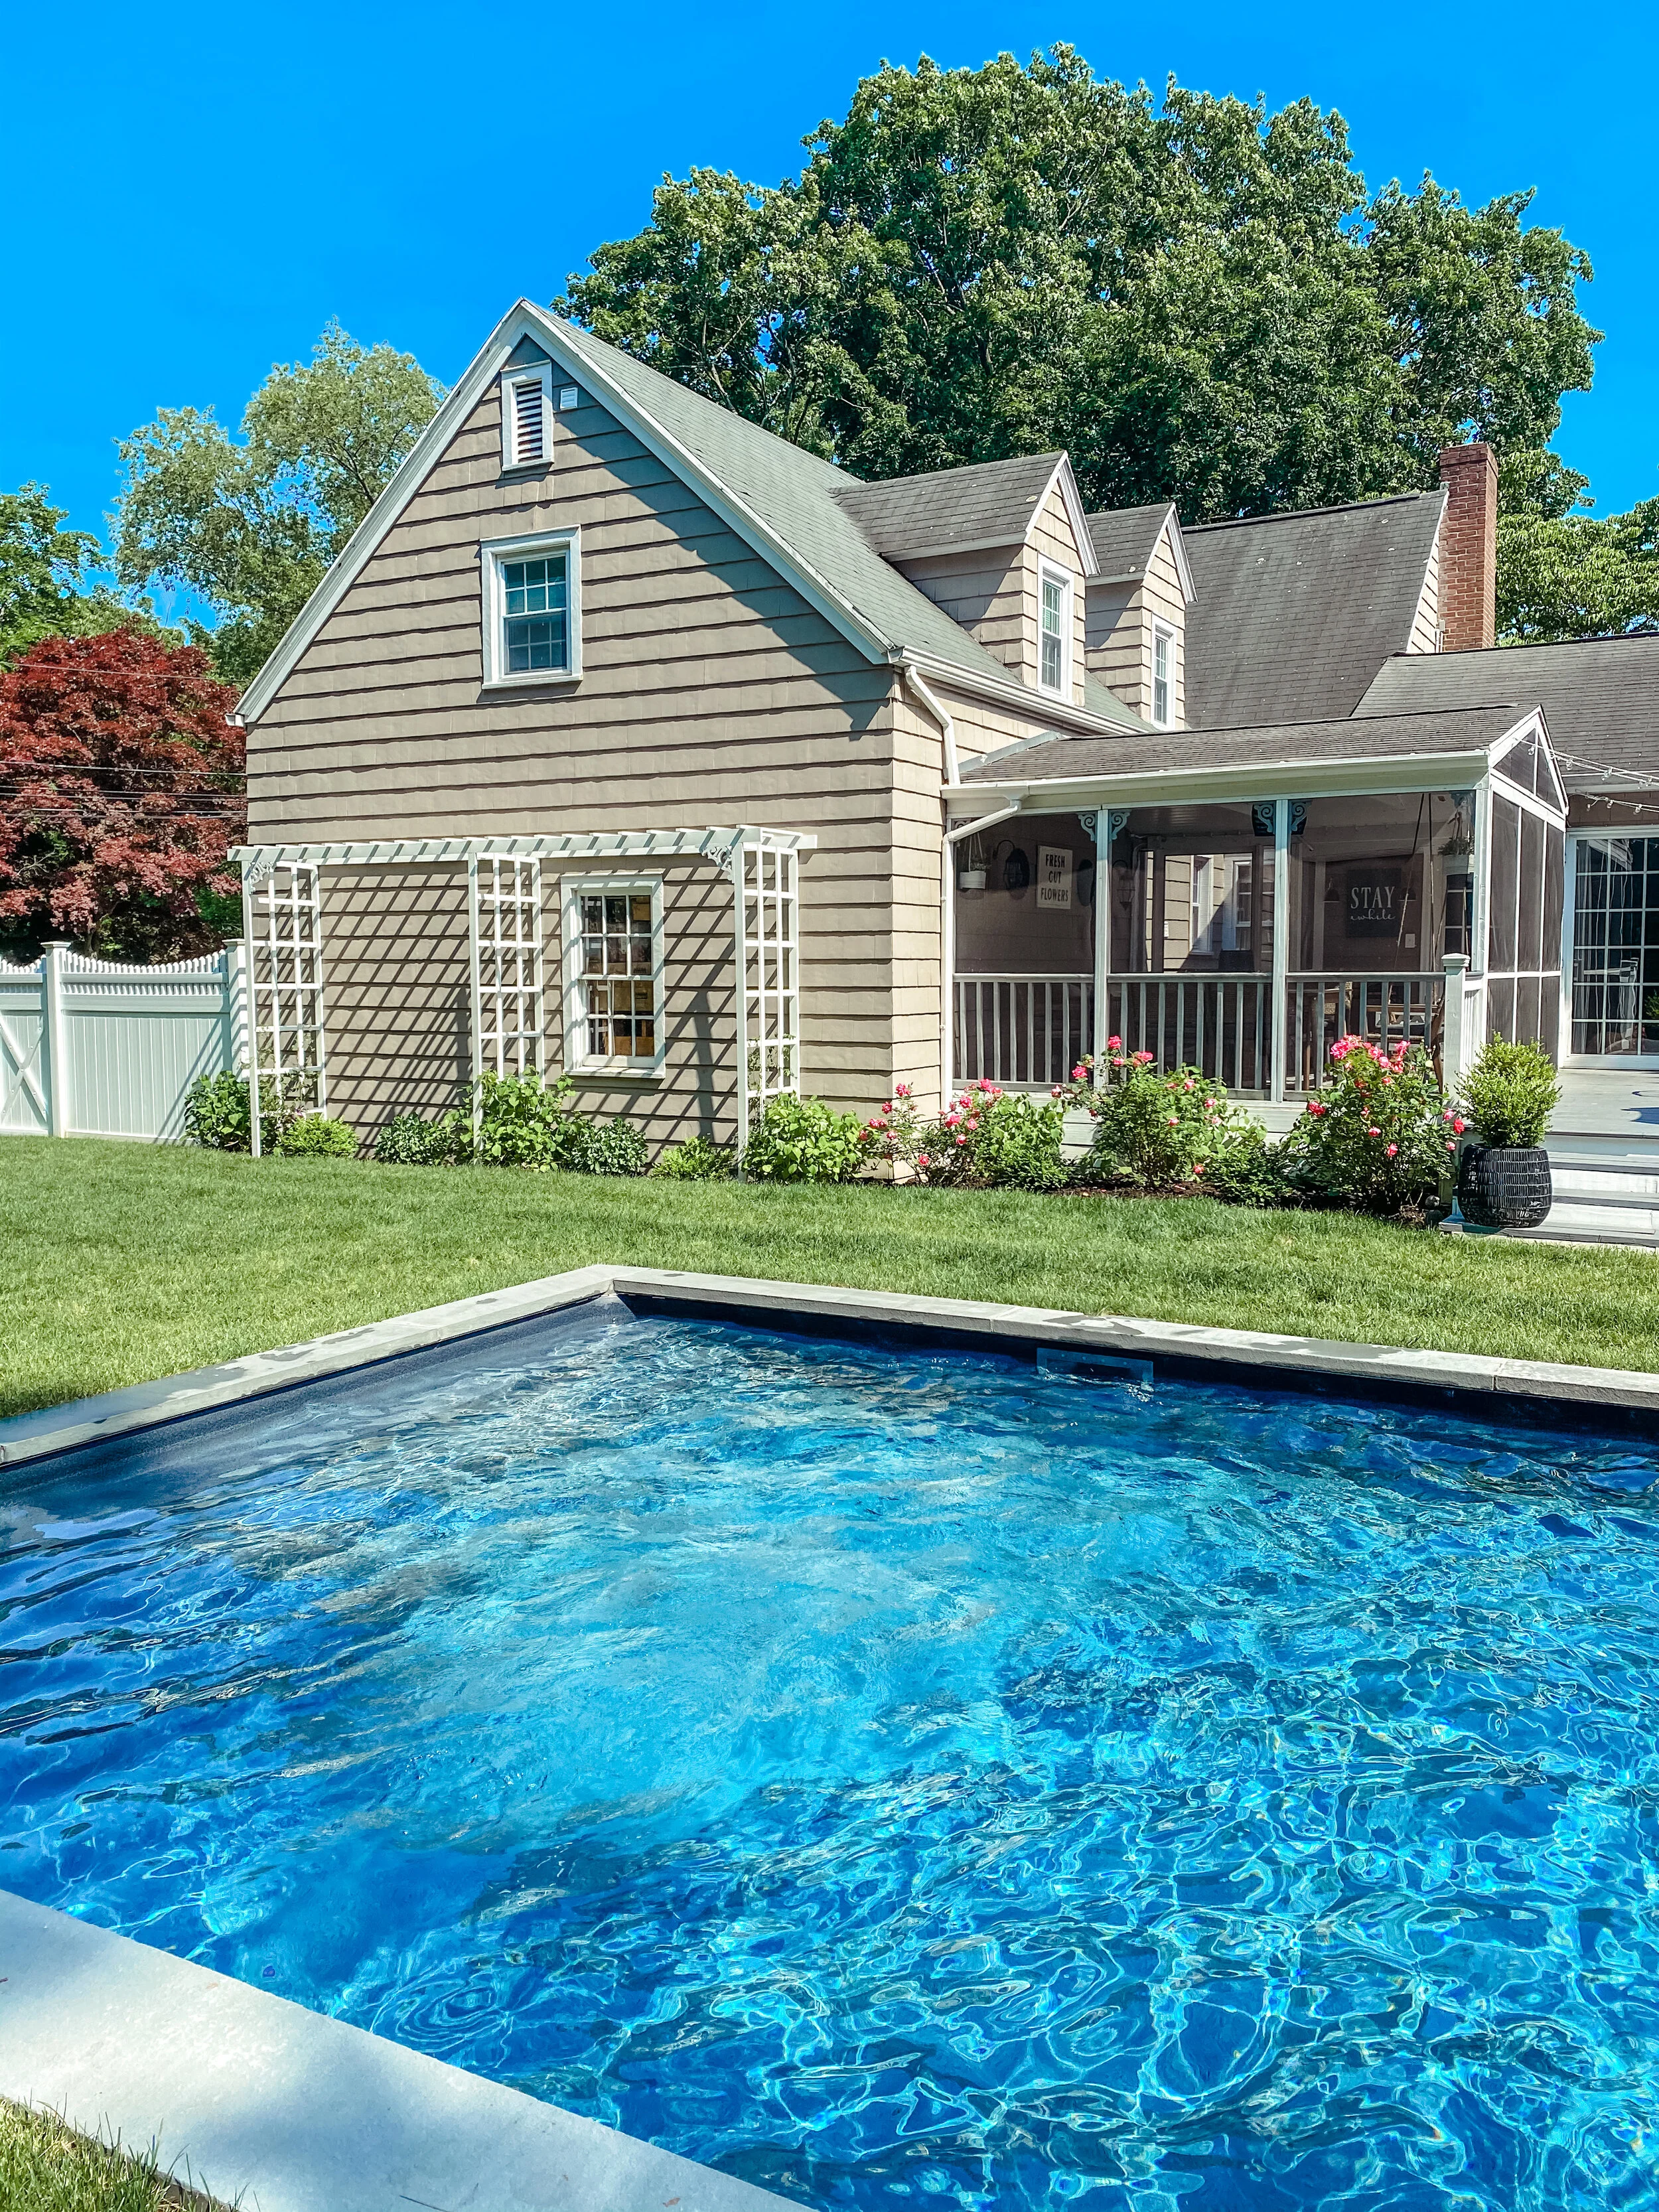
We had Nick out to our home for an estimate on May 13th. With his guidance, we decided on a 15X30 Liner pool (we are on .33 acres), with stairs across the shallow end. We signed the contract with Nick and had the surveyors come (you have to have an up to date survey of your home to build a pool) the last week in May. We got the permits from the town the week of June 8th and they broke ground on June 12th. Because of Covid there were delays with a couple of items. We decided to extend the stairs all the way across the pool. This resulted in a higher cost because this became a custom item. It also extended the timeline by a week because they were delayed. We chose a GLI Liner in Black Galaxy to mimic the darker water color you would see in a gunite pool and that too was delayed a week because of Covid. The pool was completed on July 23rd. Making the whole process a little over two months, start to finish!
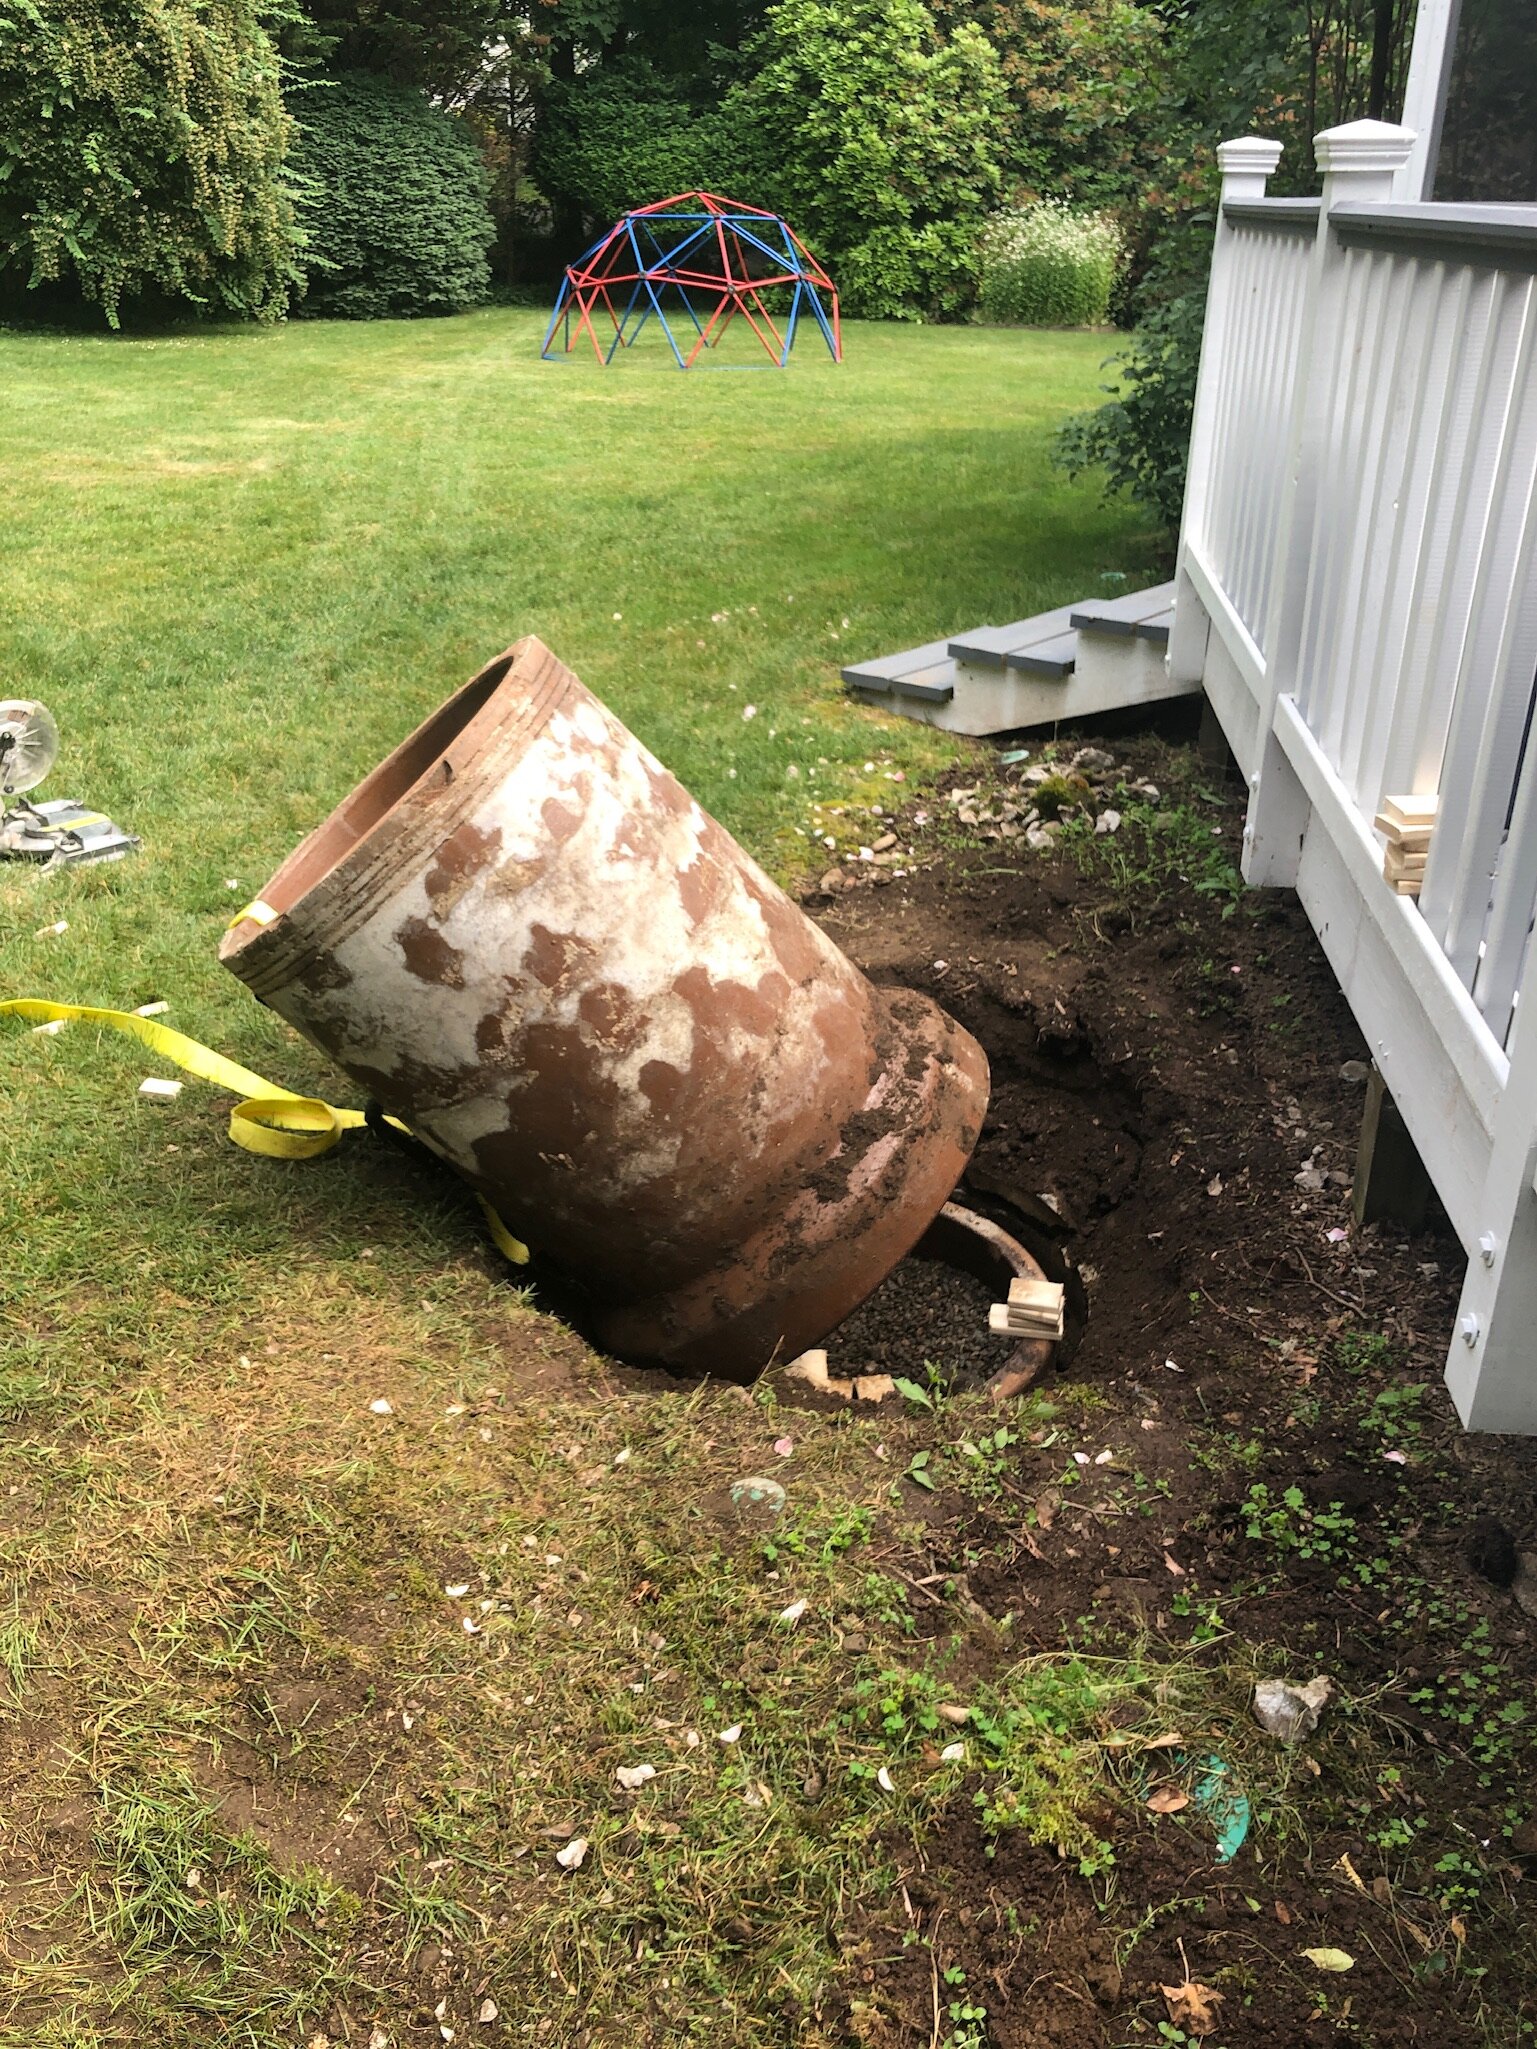
Before

Before

Breaking Ground

Breaking Ground

Oh the piles of dirt

Oh the piles of dirt

Almost Done

Almost Done

61703626197__3245926F-AD77-46C3-A1FE-B119D2969519.JPG
Water

Water

61723156321__4E87EF88-DD4C-49D0-8508-7EFF43CF33E5.JPG

One thing to note when considering a pool and the cost…you must either fence in your whole property or just the pool. We had always wanted to fence our property and really didn’t want a fence right in the middle of the yard around the pool. We wanted it to be open and blend with the natural surroundings.

Cost Breakdown:

Pool: 40K (keep in mind this is for the 15x30 pool we got with a shallow end of 3.5ft and a deep end of 6ft. Price changes as you go bigger or smaller and deeper. This price includes all extras - full stairs across shallow end, salt water system. it also includes pump, heater, all hook ups, two trucks of water, hauling away of all extra dirt

Fence: 10K to enclose our entire backyard

Sod: 4K for entire backyard

Propane Hook Up: 1.5K

Survery/permits: 3K

Biggest Surprises:

How much our yard was torn up (very little grass left), the sheer amount of dirt piles, the chaotic backyard scene durning construction, the amount of people, equipment, etc it takes to accomplish this, how much they could accomplish in one day of work, how much delays stink, how beautiful a liner pool looks, how the salt water is better than chlorine for hair and eyes, and how little grass gets in the pool even though we only have 1ft of bluestone coping around it!
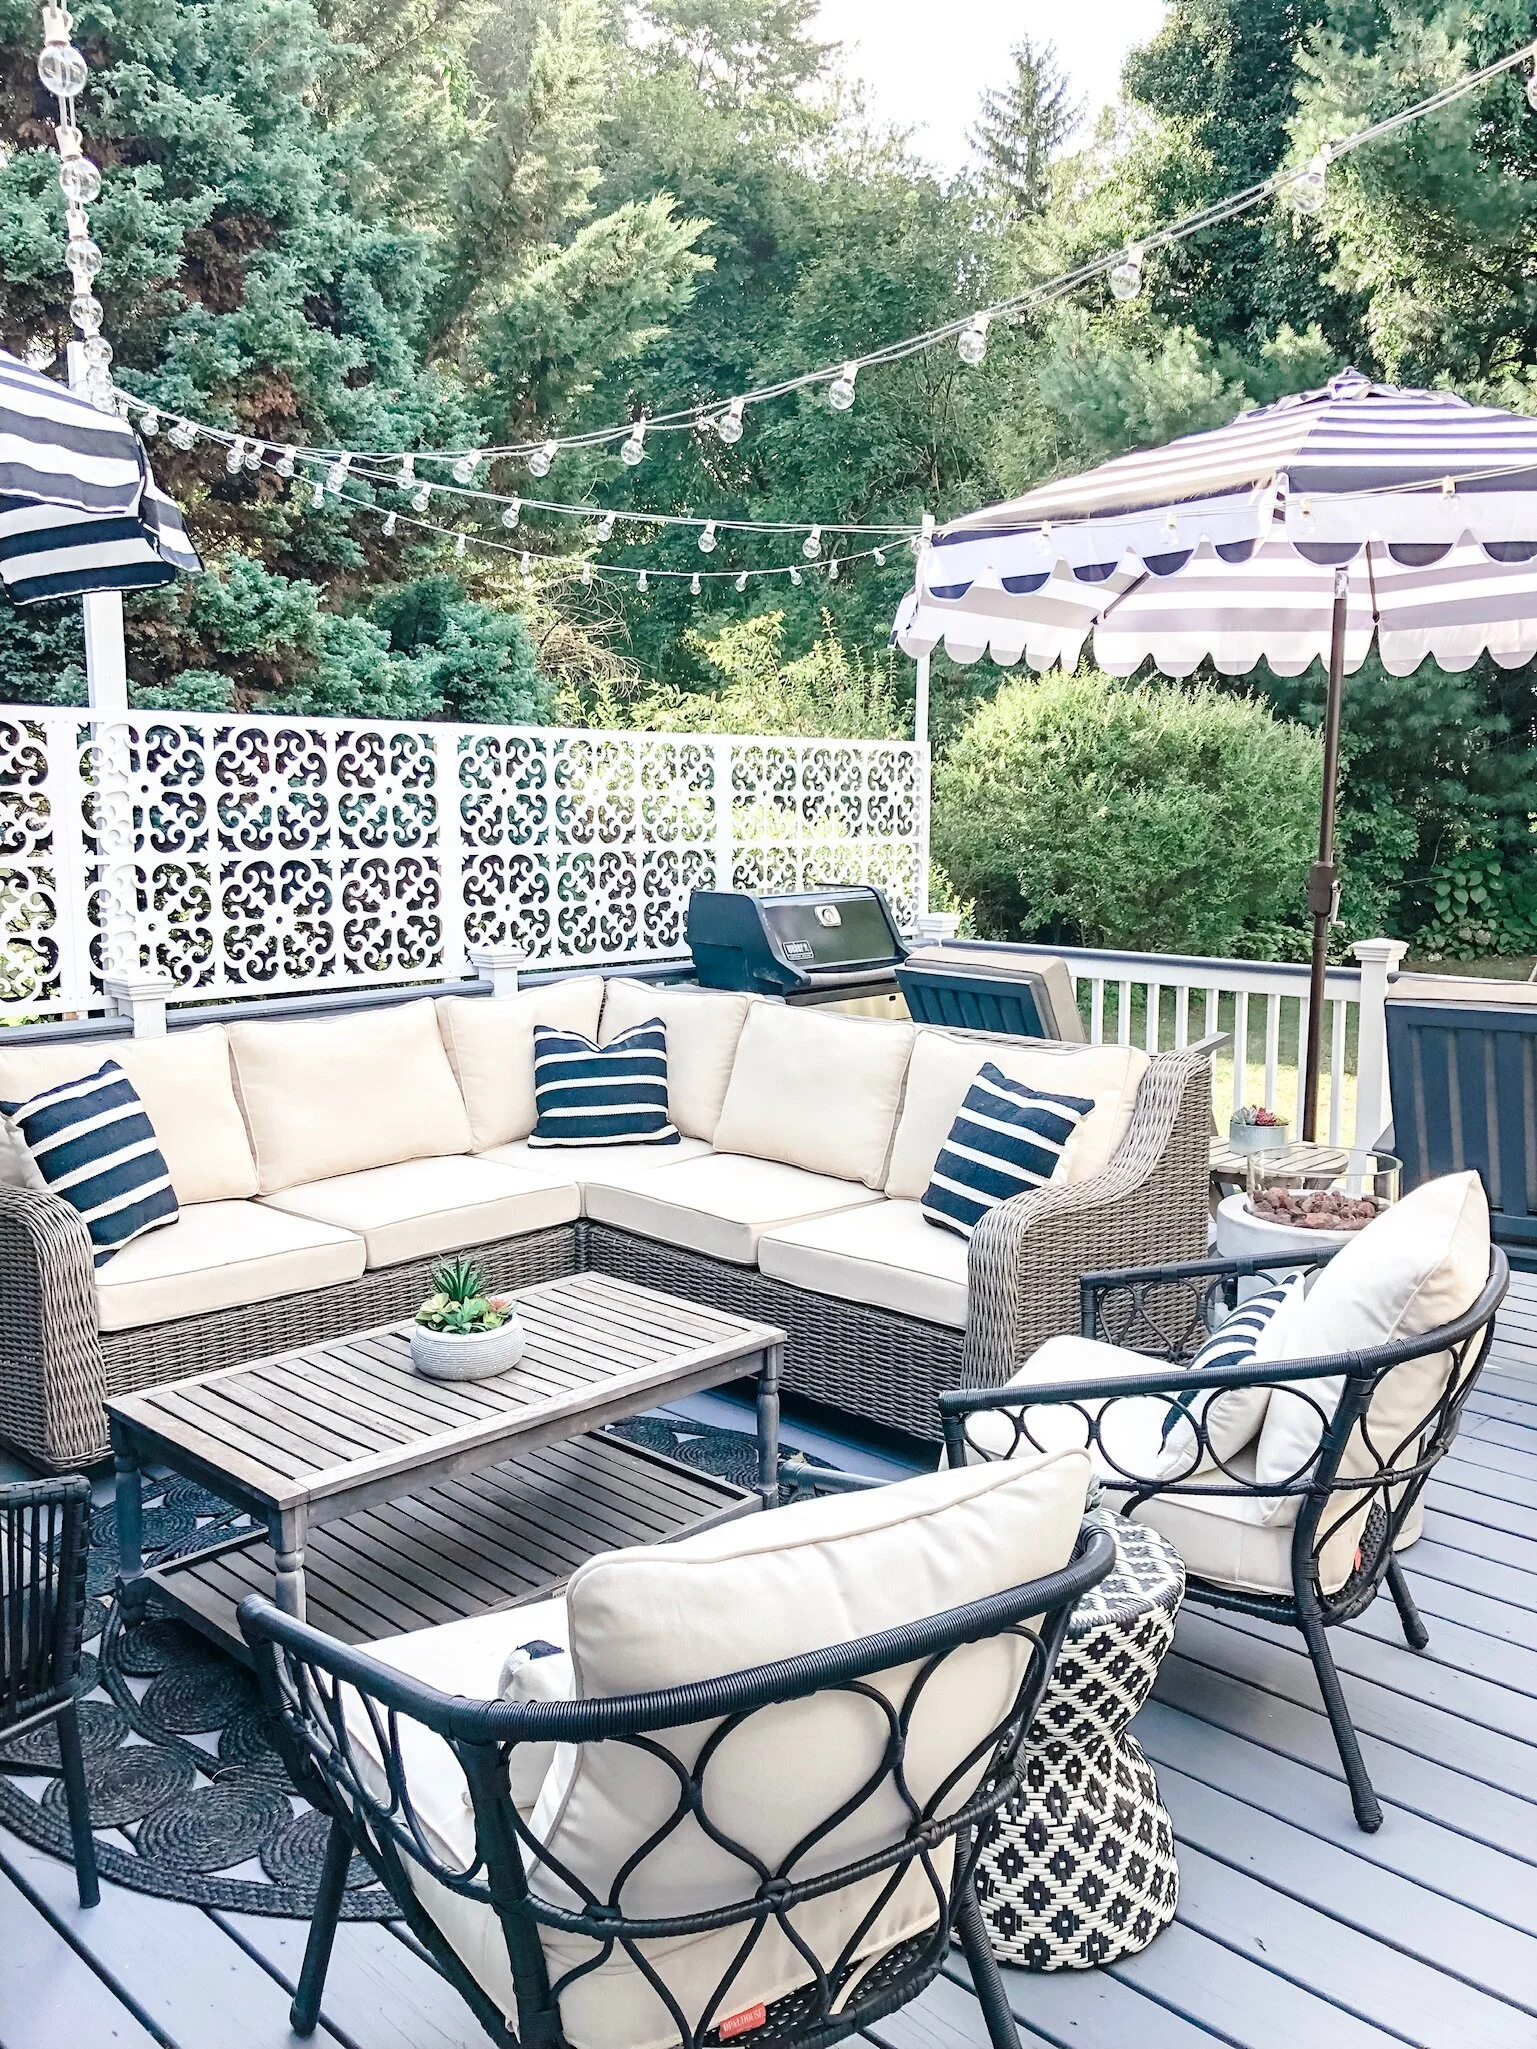
What We Think:

WE LOVE IT SO MUCH!!!!!!!! Best investment for our family and home!


Stair Runner and Painted Stairs

IMG_4143-1.JPG
IMG_4137.jpg

I laugh because this post was originally supposed to be about how we got a new stair runner, but of course, at the last minute, I had an idea that definitely complicated things - painting the stairs black AFTER the runner had already been installed!!

We have been in our home for almost 18 years and I always wavered on a stair runner. Our home is from 1940 and the floors are creaky to say the least! Finally I decided just to go for it and I am so happy I did! I partnered with my favorite rug company Boutique Rugs and found the Bonifay runner that was simple enough to go with the busy wallpaper we had done in the upstairs hallway, but still interesting enough to hide some dirt and please the eye! The idea was to buy separate runners that we could have a carpet company piece together to look like one custom stair runner. I didn’t price out what a custom runner would have been, but heard from many of quotes in the thousands ($3,000 to be exact).

Each Boutique Rugs runner measured 2’x8”. To figure out how many pieces we would need, we measured the height and depth of the stairs added that together and multiplied that number by how many stairs we had. We then added the length of the upstairs hallway and an extra 20% for waste. We came to the conclusion we needed 6 runners (total cost $750). We had some companies out for estimates and decided to go with a local company called Rudy’s Carpet and Flooring here in Fairfield, CT. The cost to do the 13 stairs, Hollywood style, with the runners was $250. It took them a few hours to complete the stairs. We talked about options for the upstairs hallway because it was more narrow than the stairs and decided the best, most cost effective option would be to have a runner just short of the entire hallway that was not tacked down, but just sat on top of a rug pad in place. The cost for cutting and re-serging the rug (making the edges neatly stitched), was $250. For this proceed, Rudy took the 3 remaining runners, worked on them and then delivered them back to us about a week later. So for a total of $1,250 we got what looked like a fully custom stair and hallway runner!

This is where this blog post should end, but of course, it’s NOT! I updated the collage frames of my kids to all black and felt like something was off.

IMG_4119.jpg

I decided to paint our banister black to match the frames! I loved it, but something still wasn’t right to my eye. It wasn’t the runner, because I LOVED that new addition. No, it was the wood peeking through on either side of the runner. Our floor stain, all of a sudden, looked super orange to me. I think it was the lighting and the colors in the runner. It was bugging me and once we painted the banister black, that was it, I had a risky idea to paint the stairs black. If you know me, you know I’m not a huge risk taker. I like to change things up, but I fear really drastic changes and have trouble committing. This is the first time I had an urge and actually followed through with it. Truthfully this was a big moment for me in trusting myself. I’m not always good at that and can be rather hard on myself. This time I decided to listen to that inner voice that said just go for it. I’ll tell you what, I’m SO HAPPY I did! For both the banister and the stairs we used one quart of Sherwin Williams Tricorn Black in semi-gloss.

IMG_4117.jpg

I couldn’t be happier with how it turned out and I hope that maybe this will inspire you to take that chance and just go for it!

IMG_4132.jpg

Essential Oils - My Story and How To Order A Kit

image0.jpeg

Why I got started

I get asked by a lot of people...WHY did you make a change? WHY essential oils? WHY now? I want to tell you what I tell them...because of my beautiful family...no one on earth means more to me than these human beings. I am the gatekeeper of our home, our health and well being. I started to ask myself am I doing everything I can to ensure the healthiest lifestyle for these precious people? 
About a year and a half ago, I found a spot on my face that looked like a pimple, but didn’t go away. I went to the Dermatologist and it turned out to be basal cell cancer. I was 42 years old, good shape, healthy eater, not too much sun exposure - what was happening? Shortly after my 13 year old son, at the time, asked me to stop using anti-perspirant and find a better alternative. He didn’t understand why he and my husband’s deodorant was JUST deodorant and why mine couldn't be too. Thus began my quest...a simple request from my son that led me to healthier options and ultimately essential oils. I knew for the most part what I was putting IN my body, but had never taken a real moment to think about what I was putting ON my body. Then I began to learn about the air my babies were breathing in - laundry detergent and cleaning products filled with chemicals and the worst of all - toxic candles burning in my home. I needed to create a clean, safe space for my family to live and breathe and I found a way to do that with essential oils. Over the past several months I have seen such a change in our overall health, happiness and well being. We no longer get headaches, my stress levels are able to be regulated, we sleep better than we ever have and my skin is glowing like never before. It has also brought us even more together as a family - making blends and rollers and educated us on so much. As my son always says “there’s an oil for that”! All joking aside, there literally is an oil for EVERYTHING!!

Are you interested in joining me and signing up for a starter kit?

I would be honored to have you enroll under me. We have the very best community with monthly newsletters, an incredible #nestingwell facebook group and you have my full support as you go along in this process! You can also follow along with my essential oils instagram page the_seasoned_life, HERE.

Here are the detailed steps on how to order your starter kit: you can access my link HERE and make sure my number 19658617 appears in BOTH the Sponsor ID box and the Enroller ID box. You will then select Member - this will get you to your starter kit (I love the Desert Mist starter kit, but my favorite is definitely the Aria), and 24% off retail prices. By choosing a kit, you do not have to sell or purchase oils monthly. Having said this, I do recommend you say yes to Essential Rewards. Let’s take a minute and talk about this.

image4.jpg
image3.jpg
image0.jpg

What is Essential Rewards and why do I want to sign up for it?

Essential rewards is an (optional) monthly membership program that rewards you for your order each month. There is no fee to become a member and to be a part of Essential Rewards, you just have to make a monthly $50 or 50pv order. You can skip one month each year and cancel whenever you would like with absolutely no penalty. The rewards to saying yes with your starter kit are amazing. You will get $10 in shop credit to spend toward a future purchase, a free oil (this month it’s citronella), 10% back on your purchases for the first three months, then 20% for months 4-24 and then 25% from month 25 on. I will also send you either a 10 piece amber bottle set or a free humidifier/diffuser combo.

image2.jpg

If you do decide to say yes to essential rewards, you will then click the box that says customize monthly order. I recommend adding the following essential oils : orange, lime and grapefruit and the Thieves household cleaner. Save your ER order and move on to personal and payment info. It’s that easy to get started! I will then send out 5 welcome recipe cards with diffuser and roller blends, ways to use your oils and the thieves cleaner. As well as a waterproof thieves cleaner label that you can put on an amber bottle of your cleaner.

Why Young Living?

There are tons of oils out there and I can only speak to these that I love. Young Living is special because they have been around for 25 years, they have their own fields and farms and they have a “seed to seal” promise. There is nothing added to these oils, they are 100% pure and concentrated goodness. This is very important, in my opinion, as we breathe them in and apply them daily.

Do I Have to Sell/Can I Sell?

Signing up for a starter kit does not ever mean you have to sell or do this business, EVER. Having said this, if you ever want to start the business side and join me, I would LOVE to have you. It’s as easy as sharing your very own link that I send to you in a welcome email! You can reach out to me here or on instagram if you are interested and I will get you set up in our mentorship program. In all honesty, all you need is a love of your oils, a desire to make a better life for yourself and your family and your link! Note, the numbers below are MONTHLY INCOME!

image1.jpg

I am here for any and all questions! I can’t wait to get you started!

DIY Paver Walkway

IMG_3435.jpg

Well who knew this was going to happen? Typically all ideas come from me after I think and think them through. Then when I’m ready with a plan, I spring them on Mr. Seasoned Home. Well, this time it was the opposite! This idea was thought up by Mr. SH and I just went with it (like he always does) and boy am I happy I did! While our small walkway/path to our stairs has always bugged Mr. SH., I never really thought much about it. He hated that it was wavy, uneven and and messy looking. Once he pointed it out, I agreed it was time. We knew we wanted to keep this project inexpensive, so we went to Home Depot to see what they had for walkway materials. We ended up choosing pavers based on a Pinterest image I found with some bricks in a herringbone pattern, and then we set out to execute it!

Here are the materials you will need to complete this project (our walkway is 36” x 72”): shovel, tamper, work gloves, paver base panels, paver edging, edging spikes, pavers , diamond tip, concrete circular saw blade and sand. Here is the process (see pictures below for steps):

  • Mr. SH dug up the old 12” x 12” slate pavers we had down.

  • He leveled out the dirt by moving it around and patting it down with a tamper.

  • He laid out the Paver base panels and made a border with the paver edging and then hammered the spikes in to hold it in place.

  • He laid two pieces of wood (1/4 inch each) on either side and put sand on top of the wood and paver panels. He then dragged a third piece of wood across to level the sand out to be around 1/4 inch thick.

  • He laid out the border of pavers all the way around.

  • To do the herringbone pattern, he started with one 45 degree, full size paver and placed it as far to the corner as he could.

  • Then he laid out the herringbone pattern using full size pieces, leaving only pieces he had to cut left.

  • Then he used a sharpie to mark where they needed to be cut and used the circular saw blade to cut them.

  • Once they were all laid, he placed one and a half bags of paver sand on top and broomed it so that the pavers would stay in place and not move.

  • Then he filled the surrounding area with strips of sod.

IMG_3465.png
IMG_3466.png

Our cost for this project:

Shovel and tamper and work gloves - already owned

Paver base panels - $13.38/each. We needed 4

Paver edging (6 feet each) - $9.28/each. We needed two (we cut the second one)

Edging Spikes - $5.98/bag. We needed one.

Pavers - .48 each and we got 100, ended up using 92

Paver sand - $4.58/each. We needed 2

Saw blade (7” blade) - $14.97

Total Cost: $150

The whole process took about 8 hours. Hope this helps! Best of luck!

DIY Hallway Renovation

IMG_3156.jpg

It’s done, it’s finally done and oh how we love it!!! We took our plain and boring upstairs hallway from drab to fab with peel and stick wallpaper, a little paint, new lights and some MDF board and batten! I will share here the cost, process and lots of before and after pictures! For reference, the hallway measures 17 feet long! To start, we switched out the recessed lights for some beautiful matte black pendant lights from Pier 1, that are unfortunately out of stock right now.

IMG_3157.jpg
IMG_3291.jpg

Next up was demo. We removed all of the old, dated doorway trim and replaced it with simple wood trim using this. We painted it Behr Ultra Pure White. Then we gutted our old, hard to maneuver, linen closet.

IMG_2661.jpg

We knew we wanted to keep this space to preserve the charm and character of our 1940 home. We also still needed the function and storage of a linen closet, but wanted to update the look and make it an eye catching feature of the hallway! We decided to get a pre-existing storage closet and insert it into the space to make it look like it was a custom built piece. To get this look, we turned to Ikea. We knew they had reasonably priced, good looking storage pieces and landed on this wall cabinet that is actually part of their kitchen collection. It was deeper than our original closet, so we ended up demoing a wall in our son’s bedroom to get it to fit perfectly. The area in Jacob’s room was dead, awkward space, so there was no hesitation about that! Mr. Seasoned Home did have to shave a couple spots to get it to fit perfectly, but he did it!

IMG_2680.jpg
IMG_3158.jpg
IMG_2935.jpg
IMG_3290.jpg

It ended up being one of my favorite parts of the entire hallway! We decided to go with the cabinet in the color Bobden Gray. If you recall, we had previously put in a new barn door with our hall bathroom renovation and painted it a very pale gray. Once the cabinet came in, I had the idea to color match the gray cabinet color and repaint the outside of the barn door that was in the hallway. We took a small piece of the cabinet to Home Depot and they color matched it with Behr paint.

IMG_3307.jpg

We decided to get similar hardware for the cabinet doors and drawers as we had on the barn door, to give it a seamless look! We went with these pulls for the doors and these pulls for the drawers!

IMG_3308.jpg
IMG_3309.jpg

Next up was Board and Batten! We used this MDF board in 4 foot high sections and 14.5” - 17”(measuring the inside of the box made) wide sections (depending on the full area) across the walls.

IMG_3133.jpg

Finally, we used this peel and stick wallpaper in the pattern Midnight Flower, size 2’ wide x 4’ tall. Though it was frustrating at times (as any would be), I can honestly say the overall process was quite easy and I would DEFINITELY recommend this peel and stick wallpaper and would DEFINITELY use it again!

IMG_3304.jpg

The cost of the project was as follows:

Pendant Lights: $165

Ikea Cabinet: $800

Cabinet Hardware: $30

MDF Baords for trim and Board and Batten: $100

Paint for board and batten and barn door and other prep items: $47/paint $30/prep

Peel and Stick Wallpaper: $500

Total cost: $1670, keep in mind, half of this was the cabinet!

This was one of the most fulfilling DIY’s we have done. The storage gained and wow factor at the end was more than I could have ever guessed. I hope you enjoyed following along with the process! Thanks for your support always!!

Five Favorite Finds

I thought I would do a post on my recent favorite finds! It’s a motley crew of sorts, but I love each one and feel like you will too!

1. INDOOR BAR CART Yes, you read that right, I finally got a bar cart and I love it so much! Its gorgeous…it has marble trays and is a brushed brass/champagne finish! Great for entertaining, but also a new spin on an accent table! I plan to accessorize mine with decorative items and flowers! You can get free shipping on it now!

IMG_2621.jpg

2. OUTDOOR BAR CART yup, you read that right! I also got an outdoor bar cart for out porch! I think it will fill that little space under the “stay awhile” sign nicely and it will act as a great asset when entertaining, for drinks and plates, napkins, etc...

Screen+Shot+2020-04-21+at+12.02.56+PM.jpg

3. Hanging wall basket I always get asked about my baskets I fill with flowers and hang from doors, walls, grandfather clocks! While most of mine were purchased a couple of years ago, I did recently purchase one that I love. As with most home decor, I think the more, the merrier! This basket is woven and two tone, which I love and easily would fit a faux or real plant. You can hang it from your front door with some welcoming spring flowers and I promise it will make you smile every time you see it! It’s a great alternative to wreaths if you have grown tired or want to switch up the look!

Screen Shot 2020-04-21 at 12.12.48 PM.png

4. Fresh cut flowers sign One of the things I get asked about most on the porch is this sign! I got mine last year, but found it in stock and think you all need it! It makes a big statement for a reasonable price and is perfect for outdoor (or indoor) decor! Its metal and sturdy and I don’t worry about it outside with the elements! It’s a creamy white vs a bright white, which I love.

E78188E6-D7D0-49F4-846E-C6F8D24C9509.JPG

5. Smeg toaster you know this one had to make the list right? Even though it’s a pricier item, it had to make it onto my favorite finds list! It’s just the perfect addition to any kitchen countertop and takes the industrial appliance look and makes it so it blends in with decor instead of sticking out! It’s also a great toaster! I would 100% recommend this one!

IMG_1973.JPG

I hope you enjoyed this roundup of random items that I am loving lately! I’ll do this again soon!

Screen Porch Refresh

In the past, I have been known to impulsively shop, somewhat piecemeal, and never have a cohesive design plan. This results in things being thrown together and not well thought out. I have learned it is better to take my time and slow my roll a bit. With this, I present my design plan for our screen porch area. The items we have now are anywhere from 3-5 years old and a bit dated. They do not reflect my design choices these days. I have decided to sell them and start fresh. The idea is that this is a welcoming area to get away from bugs and enjoy into the evening. The look I am always trying to achieve is comfortable and welcoming. I love for my home to shout this at you as you walk in the door. We LIVE in our home and our outdoor spaces and thus, they must be comfortable! After much back and forth, we decided to keep our dining table and chairs in the porch area. This does limit what we can do in the space, but in the long run, it is the best choice! We love our sectional on our deck because it can fit so many people and decided another would be a great addition. I found a really cost effective one for the size and can’t wait to see it! Below is my design plan. It’s simple, just the basics, but I cannot tell you how many pillows and rugs I went through to get to these choices. This is why it is so helpful to have a design plan!

White ceramic lanterns pictured below are currently unavailable

Untitled.png

KIDS BATHROOM REFACE WITH WAYFAIR

IMG_0021.jpg

Wow is all I can say to this project! You know when you have old kitchen cabinets and you reface them, or you have an old bathtub/shower area and you go over the existing bathtub/shower to make a brand new one? Well, that’s pretty much what we did to our kid’s bathroom that was original to the house, built in 1940. Even the toilet was the original with the date stamped on the cover of the tank…September 30, 1940! This is a tiny bathroom, about 30 sq. ft., so we did not have a lot of room for error, literally or figuratively! One question kept plaguing us…How could we redo this bathroom without gutting it? The tile up the wall definitely had cement, chicken wire and Lord knows what else behind it. We did not have the patience or the money to hire out the work and did not want to take that on ourselves. Soon enough, I came up with a plan! We could shiplap over the tile walls and tile over the original floor. we decided to leave the shower area as is, because the shower curtain would hide that. We replaced the window, toilet, vanity, faucet, mirror, light fixture, all towel fixtures and added all new decor! We basically gutted this bathroom, without actually gutting it and achieved the same result without the cost and the mess! It’s as if we slipped an entirely new room over an old one, perfectly, only losing some space, but adding so much character and charm!

IMG_0031.jpg
IMG_0022.jpg

So, what materials did we use, how did we do it and how much did it cost? Here are all the answers to all of these questions!

Material and Steps (Note, this project was completed in partnership with Wayfair):

  • We started by framing it with these furring strips. To get these in place, Mr. Seasoned Home had to use a wood drill bit to get through the wood strips, a tile drill bit to get through the tile, then a cement drill bit to get through the cement behind the tile and then had to use special, cement screws to anchor the wood to the cement.

  • To avoid shadows and seeing the tile/wood behind the shiplap boards, we had to put this white plastic panel over the wood.

  • Once that was up, we put up the boards of shiplap. We knew we didn’t want to use wood because of all the moisture and size of the room, so we found a PVC board that could hold up to all elements.

  • We spaced each board two nickels thick and nailed them to the frame. Once the walls were done, we used this cement tile that we had leftover from our fireplace redo last fall. We had just enough, with 4 tiles to spare.

  • We did the tile second, because we knew the room would be getting smaller and we had limited tile, so we wanted to use as little as possible. Mr. Seasoned Home cemented, tiled, sealed and grouted the floor himself.

  • We had a plumber come in to hook up the new toilet vanity and faucet took him about 2-3 hours.

  • Once those were in, Mr. SH trimmed out the room with the same type of PVC boards and caulked all seams. We removed the old door because it opened into the room and cut off even more space. We got this barn door and hanging kit and will install that when it comes in.

IMG_0041.jpg
IMG_0043.jpg
IMG_0042.jpg

How much did it cost? (Note this project was completed in partnership with Wayfair)

  • Furring strips – we used (3) 9 packs. Each pack was $13.50, so total $40.50

  • White plastic panel – we used 3. Each was $21, so total $$63.00

  • Shiplap boards – They come in 2″, 3″, 4″ and 6″ widths. We used the 6″ for the walls and many other sizes and variations for trim, etc…Total cost was around $1000.

  • We used 56 tiles at around $11.00 a sq. ft. The tile would have cost around $300

  • The toilet was $150

  • The plumber was $300

  • The window was $115

  • The shade was $60

  • All decor was around $180

  • Odds and ends of nails, screws, cement, caulk, etc was an additional $100

  • Vanity, mirror, light fixture, and faucet were provided in partnership with Wayfair and were around $1200

So total cost for this project was around $3,500.

Thank you to Wayfair for their amazing customer service, fast shipping and continued support and partnership! We couldn’t ask for a nicer company to work with!

IMG_0023.jpg
IMG_0036.jpg
IMG_0024.jpg
IMG_0037.jpg
IMG_0028.jpg
IMG_0035.jpg
IMG_0025.jpg
IMG_0038.jpg
IMG_0027.jpg

OUR DECK EXPANSION

IMG_0078.jpg

How much space did we gain? What materials did we use? What plantings did we choose? What was the cost of this DIY? All your questions will be answered here in this blog post! As many of you know, we decided to tackle expanding our deck this summer! It was a labor of love, for sure, but one that, in the end, we knew would be worth it!

Our first, and really only, obstacle was the large well that was original to the house. Though it was neat looking, after 16 years here, we decided that was not enough to keep us from moving it any longer! It caused our deck to make a sharp angle and cut into a lot of usable space. For a long time I fought taking it down because of its history to our house, but in the end, function won! We added about 80 sq ft of deck space.

 Landscaping before

What was the cost…We spent about $150 on cement footings and the cement, cement mixer and concrete forming tubes. The frame lumbar was pressure treated from Home Depot and cost about $300. The decking boards were pressure treated 5/4′ premium decking boards from a local lumbar yard and we spent $250 on those. The Railing were Home Depot pre-built railings, hand rail, and square cap. We needed three and each was $60 so $180 on that. The skirting was 1x6x12 boards and cost about $100. We paid to have the entire floor and the NEW railings and skirting painted for $350. To landscape the entire side of the house and porch/deck was $375 for 5 hydrangeas, 6 boxwood plants and 2 sedum plants as well as mulch from home depot.

IMG_0079.jpg
IMG_0074.jpg
 

LIVING ROOM REDO WITH RAYMOUR AND FLANIGAN

Thank you to raymourflanigan.com for kindly sponsoring this post. All opinions are 100% honest & completely my own.

All products in this post have been provided by Ramour & Flanigan

If I had to choose one room in my home that I never felt really worked, and was more of a collection of all sorts of styles, it would have to be my living room. Don’t get me wrong, a room doesn’t have to be match-y match-y to work, in fact I love mixing different pieces and styles together, but this room felt like it had too many competing styles and too much going on. Not to mention it was in dire need of a paint job. The last time we painted it was 16 years ago when we moved in. Every time I tried to photograph it, I just didn’t love the picture.  My eye was drawn all over the place and the navy couch, which I once loved, was now sticking out like a sore thumb with the more neutral pieces.

If you recall, when I did the Bloggers Heart Habitat, Raymour & Flanigan fully funded all of the furniture and needs for the home we redid. So, when they approached me about partnering together on a room redo, I jumped at the chance to work with such an amazing company and finally make this room exactly what I envisioned it to be in my mind! A neutral, tranquil space that was sophisticated, yet comfortable, formal, yet approachable. As I say all the time, I love spaces in my home to be beautiful, but also able to be lived in and on. For this room, I definitely wanted it to have accents of my growing obsession, french country decor! I hoped for cane chairs with thick, pillowy cushions and a tufted sofa that had a soft, romantic shape and arm. I wanted a round coffee table, and end tables that had a bit more of a presence to them! What I found at Raymour and Flanigan was all of these things! Their showroom is filled with choices and an incredible selection and the customer service was top notch. I felt like the gentleman who helped me select the pieces had my best interests in mind and listened carefully to what I was trying to create. A couple of the pieces were special order and he combed the store looking for fabric samples similar to those pieces so I would be certain I was getting exactly what I wanted. The pieces that were in stock were available in three days or less, which was amazing and the special order pieces came in long before anticipated. Delivery, which is seven days a week, was seamless! Overall, it was a wonderful experience!

Here is the reveal!! Here are the before and after pictures:

IMG_0093-1.jpg
IMG_0096-1.jpg
IMG_0094.jpg
IMG_0095-1.jpg
IMG_0089-1.jpg
IMG_0098-1.jpg
IMG_0103-1.jpg
IMG_0100-1.jpg
 

DIY WINDOW BOXES

IMG_0069.jpg
 

You guys, YOU GUYS!!!!!! Do I have your attention now? We MUST talk about our latest diy! In the 16 years we have lived in our home, I have always wanted window boxes on our cape. I feel like it is the type of house that looks adorable with them! A few things stopped us along the 16 years: 1. They are expensive, 2. We had babies, which derailed all diys for a while, 3. Our windows are fairly wide and we have bay windows, 4. The good, vinyl, nice looking ones I wanted were expensive – have I mentioned that already?! Last year I finally bit the bullet and ordered two – one for each window in the front of the house. I decided to just do the middle window of the bay windows. BAD idea! First, they weren’t wide enough, second, they looked funny not encompassing the whole window. So, I returned them and moved on, BUT the itch for wanting them was still very much there! SO, this year, I finally decided that if Mr. Seasoned Home could build us a screened porch, shiplap a vaulted ceiling, tile various rooms, and do all the woodworking around our house, then I bet he could figure out how to make us some window boxes! Boy was I right! Then I figured if they gave me this much joy, then I must share them with all of you, because more than likely they would give you joy too! So the following is all materials needed, how we hung them and finally what we filled them with!

IMG_0071.jpg
IMG_0070.jpg

The following are the materials needed to make one window box of any width. For reference, ours range in width from 3-5 feet and are all 8 inches tall and 7.25 inches deep. You will notice that the materials are not inexpensive, but we went for what was most durable and long lasting. We wanted to do this once and only once! This material is made of PVC and meant for the outdoors and the elements. You will need 3 (1×8) boards for the bottom, front and back of the boxes. They come in lengths of either 8 or 16 feet. You will need 2 (1x8x8) for each end cap. Then for the decorative trim, which we used to add interest, you will need 2 (1×2) of whatever width and for the vertical detail pieces, you will need to cut all vertical trim pieces to 5.25″ each and 1 (8×8″) L Bracket for about every 2 feet of your window box. We also used brad nails and a nail gun. The cost of one 5 foot window box was approximately $70 to make.

IMG_0077.jpg
IMG_0076.jpg
IMG_0075.jpg
IMG_0074.jpg
IMG_0073.jpg

BLOGGERS HEART HABITAT PROJECT

IMG_0060.jpg

Words cannot begin to describe the excitement I felt when my sweet friend Charlotte, from At Charlotte’s House, asked me to be a part of an incredible project she began a few years ago. The project is called Bloggers Heart Habitat and with it, she has found the perfect way to combine her passions for design, decor and doing good! Each time, she gathers up a team of Interior Designers and Decor Bloggers (for this one, it was Diane from The Rath Project, Carli from Fearfully & Wonderfully Made By Carli, Michelle from Weekend Craft, Kelly from Street Flea Style, Jessica from Jessica Brigham, Kate from Kate Smith Interiors and Robin from A Home To Grow Old In) and together we have the privilege of making over rooms in a new house built by Habitat for Humanity with the help and generosity of Raymour and Flanigan. Not only did they provide the furniture, but they also provided us with a cash stipend for extra items and accessories to make the space feel more cozy.

We broke into three groups to tackle the three rooms we were working on – the girl’s bedroom, the master bedroom and the living room/kitchen area.

I worked with Charlotte and Kate on the little girl’s room. The family was very open and not too specific. They did say that they try to incorporate Feng Shui – “the use of energy forces to harmonize individuals with their surrounding environments” into their living areas so we were able to add elements into the room. Here is the before photo of the space.

IMG_3764.jpg

We chose a beautiful bed and dresser with a changing table attachment and put them on opposite walls – the bed by the window and the dresser as you walk into the room. We added some fun, furry friends in the corner and a sweet arts and crafts table to the space as well. We incorporated the Greek key pattern on the pillows because it stands for power and prosperity as well as the bamboo mirror and the elephant planter because they are symbolic of luck within the principles of Feng Shui.

IMG_0054.jpg
IMG_0056.jpg
IMG_0053.jpg
IMG_0058.jpg

When the family and their little girl saw this room for the first time, it was pure magic. Not only did they love all of the elements of it, but they said over and over how it was now a home. They were in disbelief, and at the same time, thrilled that this was THEIR home. As someone who prides themselves in making people’s houses into homes, more meaningful words could never have been spoken. The graciousness and appreciation from this beautiful family was so incredible. The happiness my heart felt could not be contained! We did it and now this lovely family has a beautiful home to call their own for the rest of their lives!

IMG_0055.jpg
IMG_0061.jpg
IMG_0052.jpg

Thank you to Charlotte for reaching out to me, Raymour and Flanigan for all of the beautiful furniture and to all of the amazingly talented ladies I had the privilege of working with. This is an experience I will most definitely never forget. Please make sure to head over to the other blogs listed above to see the other rooms that were completed in the home!

image2-1.jpg


1 Comment

Designsite

Designsite is an award-winning website, digital marketing and branding firm, based in Fairfield CT. We’re an original Squarespace Expert and have helped over 200 startups, nonprofits and businesses of all sizes build a successful online presence. Please contact us at info@designsite.com to learn about how we can help your business.

EMILY’S ROOM REFRESH WITH OVERSTOCK

I am so excited to finally reveal Emily’s room refresh! I have mentioned it in my stories a bunch. Now I want to show you and take you through everything we chose to update her room with and it’s all from Overstock. I have been a loyal Overstock customer for years now. I feel like their prices cannot be beat and their products are not only affordable, but also beautiful and long lasting!

Emily, being the second child, received all the furniture hand me downs. The majority of the items in her room were 14 years old and meant for a nursery/small child. We knew we wanted to update her bed, dresser and night stand to accommodate her growing needs. We also decided to update her light fixture and bedding to add a little more personality to her room!

We sat down together and started our online shopping expedition with Overstock. They have so much inventory and so many styles, it’s hard not to love everything! We narrowed it down, taking colors and styles into consideration and ultimately landed on the Arielle Antique White Sleigh Bed with Trundledresser with mirror and Night Table. We loved the antique feel of the knobs and pulls on a modern piece of furniture. The drawers were deep and spacious (amen for all the clothes) and the trundle will make it so much easier to accommodate sleepovers and guests. We chose the Avery Home Lighting Princess 4-Light Chandelier because it was elegant with its crystal drops and reminded Emily of a “princess chandelier”. Last we chose the Sweet JoJo Designs Blush Pink, Grey and White Chic Watercolor Floral Collection Twin Size Comforter, because we both love florals and soft colors and felt it would match nicely with the new wallpaper. We wanted her room to reflect more of who she is now – a spunky 10 year old and one that could grow with her into her tween/teen years! It was so amazing to see Emily’s eyes light up as we unpacked each item! The squeals and wonder at these items that were all her own! Assembly was a breeze and quality was amazing!

One of things I love most about Overstock is the variety they offer, the discounted prices (and awesome coupons they send through email) and the fast, free shipping. Their customer service is amazing and is so important when shopping online. It can be hard when you cannot see and feel a product, but their return policy and customer service make it so easy to try products out. We couldn’t be more pleased with how this room turned out and feel beyond blessed to have been able to work with Overstock on this project.

 
IMG_0022.jpg
IMG_0019.jpg
IMG_0018.jpg
IMG_0021.jpg
IMG_0020.jpg

xSEASONAL AND HOLIDAY DECORATIONS

Well, here I am, FINALLY writing this blog post I have been talking about for the last few days! You voted and the winner was seasonal/holiday decorations! When a new season approaches, I think about the colors I associate with that season. For spring, those colors are soft, pale pinks, greens and yellows. Honestly all pastel colors, but I narrowed it down to those three. I then think about spaces that I want to sprinkle in some fresh seasonal decor. In my house, those areas are pretty much any tabletop (haha – just kidding, maybe)! In all seriousness, the areas I usually focus on are: my kitchen, the shelf on the hood above the stovetop, the areas to the left and right of the stovetop, the island and the dining tabletop. In the living room, it’s usually the mantle, although this year it was spring-y enough! In the family room, the console table and the piano and the mudroom kind of in general! Also, the back porch always gets some love, the front porch, not quite yet and all doors inside and out as well. If anything is leftover, I sprinkle some fun in the bathroom too!

So, what do I use to spruce things up? Given that spring coincides with Easter, I always gather up some bunnies, eggs, trees and wreaths from my favorite stores such as Homegoods, TJMaxx, Marshall’s, Pier 1, Target and Hobby Lobby. The first 4 stores are BY FAR my absolute go to’s for holiday decor, while I use items from the others to fill in! Wreaths and florals are another way and we CANNOT forget about my all time favorite – GARLAND!!! If I could hang garland in every room, I would! I try to keep my holiday decorations fairly muted – no super bright, harsh colors and even though we are talking about bunnies, I try to keep it classy and somewhat sophisticated to match with my other decor, so it doesn’t stick out like a sore thumb. I planned my kitchen decor around a wreath I got at Pier 1 this year that I can’t find online. I played off of its many colors! I love keeping my scale from Decor Steals out all year long and putting some green boxwood wreaths like these under whatever decoration is appropriate.

For my back porch, I got this and these to fill it and put out some simple eggs like these these and these on my antique chair. I got a doormat similar to this and am going to layer it over this that I just ordered. My front porch has this doormat layered over this rug.

My favorite place for florals are amazon for these incredibly real tulips, Michael’s for flowers and Hobby Lobby for greenery like this. This greenery is my absolute favorite, I have it all over, not just during spring or holidays. Its soft, feminine and a little more delicate than a lot of other greens out there.

Decorating for the holidays should be fun. It should be fairly easy and not too involved. I hope I have provided you with some ideas for how to spruce up your home!

 
IMG_0017.jpg
IMG_0016.jpg
IMG_0015.jpg
IMG_0012.jpg
IMG_0011.jpg
2 Comments

Designsite

Designsite is an award-winning website, digital marketing and branding firm, based in Fairfield CT. We’re an original Squarespace Expert and have helped over 200 startups, nonprofits and businesses of all sizes build a successful online presence. Please contact us at info@designsite.com to learn about how we can help your business.

DIY CHALK PAINT PROJECTS AND WHERE TO FIND THEM

I must start this post by explaining that I am by no means an expert on anything I speak of below. I’m just sharing what has worked for me, a novice, at painting and rehabbing furniture.

Lately, I have been obsessed with finding vintage furniture pieces and rehabbing them. I have a newfound love for this process and I have to say it is so much easier than I perceived it to be. You do NOT have to be any type of expert at this. If I can do it, I promise you can do it and I have to admit, I’m hooked. I find it an inexpensive way to be super creative and when I am done I feel so proud and such a sense of accomplishment!

For all of my projects, I began by scouring Facebook Marketplace! You would be amazed at the vintage pieces you can find for such incredible prices on here. One tip – don’t be afraid to negotiate. Offer what you consider a fair price and a bonus is offering to pick it up that day. Most of the time, people want these pieces out of their homes to make way for new items or because they are moving, etc…Another tip, be consistent. If you have a piece in mind that you are searching for, continuously search for that piece daily. I did that with these items, everyday for a couple weeks and was able to find everything I was looking for.

The beauty of chalk paint is that prep work is non existent! All you have to do is start to paint! Get a drop cloth, take any drawers/hardware out and off and get started. I have used Rust-O-Leum ultra matte chalk paint in both Linen White and Aged Grey.  This paint goes on smooth and is amazing. In all cases, I have used two coats to get the complete coverage needed. This is a great painting set to get you started, because it has the tray, brush and roller. We were able to use a roller on a lot of areas on each of the pieces we painted. This saved time and provided great coverage! To add interest on one piece – a secretary desk that was rather plain, I added these these and this this before painting.

Now for distressing…the very word scared me so much…until I just dove in. Then it became a fun challenge! Again, a novice at this too, I had no idea what I was doing! I studied some pieces that had been distressed on Instagram and realized that it’s best to distress areas that would get traffic, corners, edges and any detailed trim work you want highlighted. Paint can tend to cover up the details of trim work, so in order to make it “pop”, you can simply distress it! I started out on a learning curve! I got these gloves to keep my hands from falling off! I began with sandpaper and quickly realized that if it was a large piece, that was not going to cut it! I ended up using and really liking these sandpaper blocks.  I try to wait a day before distressing, though sometimes my excitement, coupled with my impulsivity, do not allow me! These may not be the most cost effective way, but to me, they are the easiest and most comfortable. Make sure you are sanding on a drop cloth, because the dust goes EVERYWHERE!!! My husband has a mini shop vac like this one which is AMAZING for cleaning up in the wake of distressing! Not all pieces need to be distressed, it’s really a personal preference. The most recent piece I did, I ended up not distressing for a more polished look.

Once your project is painted and distressed, many people encourage sealing the final product with wax. It can be a clear wax, keeping the original paint color, or one with a stain color to darken the piece. I have not actually waxed any of my pieces, because they are not high traffic pieces that will be used a lot! If you are painting anything that will be getting a lot of use, I would highly recommend this. Since I have yet to use it, I don’t feel right recommending one to you, as I like to only recommend products I have tried and liked. I am sure the paint department at Home Depot can help though! I’ve included pictures of all the pieces I have painted and distressed.

My final piece of advice…take the chance, believe in yourself and your capabilities, have fun, and remember it’s just paint! If you don’t like it, you can always paint it again! Good luck, YOU CAN DO THIS!!!!

 
IMG_0008.jpg
IMG_0003.jpg
IMG_0009.jpg
IMG_0006.jpg

WELCOME TO MY BLOG

Oh my goodness!!! I am writing the first words on MY BLOG! I, Stephanie, have a blog. What? Ok, apologies, this is just a surreal moment occurring during what has been the most surreal year for me. For those who may be new here, I’m Stephanie, a wife, mom of 2 fantastic kids and lover of all things home decor. I started my IG account, @the_seasoned_home in October of 2017 and I had no idea at that time it would would bring me to this point. I did it almost as a dare to myself, a challenge. I was, and still am, on an extreme kick to challenge myself to do things I once perceived as “scary, uncomfortable making and altogether beyond my comfort zone”. I realized the only way to grow is to get comfortable being uncomfortable, so here I am. I hope to tackle many topics on this blog…DIYs, home decor, recipes and who knows what else! It will be a complete work in progress. I plan to do a home tour soon and will put that on here as soon as possible. I just want to take a moment to truly thank you for taking the time to stop by, this is an absolute dream come true for me and I’m so happy you are here with me along this journey!

IMG_0001.jpg